Plumbing Rough-In Before a Post-Tension Slab Foundation Pour
Introduction
Plumbing rough-in is the process of installing all the necessary pipes and drain lines in place before a concrete slab foundation is poured. In slab-on-grade residential construction – especially when using a post-tensioned slab – this step is absolutely critical. Once the concrete is placed and cured, those pipes become permanently embedded, making changes or repairs extremely difficult. Any layout error now could put a drain or pipe in the wrong location, a mistake that becomes literally set in concrete after the pour. Careful planning and precise execution of the plumbing rough-in are therefore essential to avoid costly problems later and to ensure a reliable plumbing system for the home.
Understanding Post-Tension Slab Foundations
A post-tension slab is a concrete foundation reinforced with high-strength steel cables (called tendons). These cables are laid within the slab and, after the concrete cures, they are tightened to put the slab in compression. This technique significantly increases the slab’s strength and resistance to cracking. The important implication for plumbing is that once a post-tensioned slab is in place, cutting or drilling into it later is extremely risky – hitting a tensioned cable can be dangerous and very expensive to fix. Therefore, every pipe that needs to go under or through a post-tension slab must be positioned correctly before the concrete is poured.
Planning and Layout
Thorough planning is the first step in a successful plumbing rough-in. On the building site, the team marks the locations of walls and fixtures on the prepared ground (using chalk lines or stakes) to guide where the pipes should go. All measurements are taken from a fixed reference point (such as a known corner of the foundation) to keep the layout accurate and consistent. This careful preparation ensures each pipe will align with the intended walls and fixtures, and it helps avoid any conflicts between the plumbing and the structure of the foundation.
Key Steps in the Rough-In Process
Once the layout is established, the under-slab plumbing is installed through several important steps:
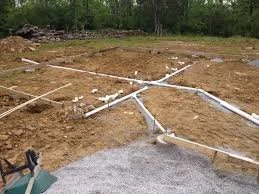
Excavation and Trenching: Trenches are dug for the main sewer line and the branch drain lines according to the marked layout. Each trench is deep enough to allow the proper downhill slope for the pipes while staying below the future slab level.
Drain Line Installation: Waste drain pipes (usually PVC) are placed in the trenches and sloped toward the main sewer outlet (typically about a 1/4 inch drop per foot of pipe run). All fixture drains (for toilets, sinks, showers, etc.) are carefully positioned at their exact locations so they will align with the finished walls and fixtures. Vertical vent pipes are also installed at this time, with capped pipe sections stubbed up where they will later continue through walls and out the roof.
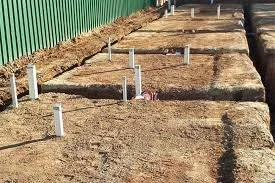
Water Supply Lines and Pipe Protection: If needed, water supply pipes are run at this stage as well (often using flexible PEX tubing or copper). Any pipe that will penetrate the slab is sleeved or wrapped for corrosion protection and to allow for expansion. All pipes are secured in their correct positions; for example, vertical stub-ups are braced so they will not move when concrete is poured. Open pipe ends are capped to keep out dirt and debris.
Inspection and Testing: Before backfilling, the plumbing rough-in is inspected and tested. The inspector checks that the installation meets local code (correct pipe sizes, proper slope, and approved materials) and verifies that there are no leaks in the system. For instance, the drain lines may be filled with water to confirm that the water level holds steady, and any water supply lines are pressure-tested. Only after the system passes inspection can it be approved to cover the pipes and proceed to the next steps.
Backfilling and Compaction: The trenches are then backfilled in layers, compacting soil or sand around the pipes to eliminate any voids. A well-compacted fill provides solid support for the concrete slab and helps prevent the slab from settling or cracking in the future.
Preparing for the Slab Pour
With the plumbing rough-in complete and approved, the foundation crew prepares for the slab pour. They set up the slab formwork and place the steel post-tension cables (tendons) and any required reinforcing steel as specified by the engineering design. At this stage, it is crucial that all pipe stub-ups are clearly visible and well-marked so they are not disturbed during the pouring of concrete. Often, the plumber remains on site during the concrete pour as an extra safeguard. If a pipe does shift or need adjustment while the concrete is still wet, it can be corrected immediately – because once the slab begins to harden, no further adjustments are possible.
After the Concrete Pour
Once the concrete has cured, the post-tension cables are tightened (tensioned) to strengthen the slab. The rough-in plumbing is now permanently encased in concrete, with pipe stub-ups protruding at the planned locations and ready to be tied into the rest of the plumbing in the next phase of construction. Any mistake discovered at this point – such as a misaligned drain or a forgotten pipe – would be very difficult and costly to fix because it requires cutting into the new slab (which is especially problematic in a post-tensioned foundation due to the cables). Fortunately, the careful planning and inspection done during the rough-in stage make such issues highly unlikely.
Conclusion
In summary, a successful plumbing rough-in before a post-tensioned slab pour requires good planning, precision, and quality control. By installing the under-slab plumbing correctly and verifying it before the concrete is poured, builders ensure that the foundation and the plumbing will work in unison. This attention to detail gives homeowners peace of mind and helps avoid expensive repairs down the line. Ultimately, careful rough-in work contributes to a strong foundation and a reliable plumbing system that will serve the home for years to come.